
After choosing the order type (and possibly entering an order number)an input screen is displayed:
Supplier: Enter the supplier code or number or enter (part of) the name and click on the ‘’ button to retrieve the supplier.
Note:
A supplier must be defined in AFO 241 before name or code can be used here. When entering the supplier you can also use the ‘M’ option (Memorize) to retrieve the last used supplier record.
Ref. no: Enter a reference number. There are no checks performed on entry in this field. This reference number can then be printed on any correspondence with the supplier (e.g. order forms, reminders, etc.).
The reference can be a number or any other data.
External order number: optinal field for manual entry of an external order number.
Next the input screen for the first partial order is shown:

Distribution list: Distribution lists can be used to create multiple partial orders. The library can define distribution lists for recurrent ordering steps. In a centralized environment an order for a bestseller can always be created according to the following pattern:
Location Quantity
BD 5
CEN 8
NOR 3
EAST 2
WEST 7
The library can define distribution lists comprised of multiple distribution lines. Each line consists of location, ship to code, budget and quantity. During the ordering process you can select a distribution list so you do not need to enter the majority of order information.
Destination code: Select a code from the dropdown list.
The system will only show codes as defined in AFO 244 (‘Destination codes’). This does not apply to external orders. When creating an external order you can only enter a destination code that has not been defined in AFO 244.
One destination code can be linked to multiple locations, which allows you to order copies for multiple locations in one partial order. Read the description of AFO 244 for more information on destination codes.
Shipto code: A shipto code can be added to each partial order. This code determines to which address the ordered materials must be shipped. If no code is entered the default code set for the institution of the location will be used.
Budget: Select a budget from the dropdown list. Only codes defined in AFO 243 (‘Budgets’) can be selected.
Selection code: Optionally you can enter a code here for use with SSP. The codes are not relevant for the ordering process and are not checked by the system.
Material type: Here you can select a material type for the on order item which can be used with further processing of the item (e.g. place reservations on on-order titles).
Circulating stock category: With this option you can link an on-order item to a circulating stock collection. These categories are defined in AFO 469.
Quantity: Enter the quantity for the destination code. The default is 1 (one). If the number of copies for each location is different you must create separate partial orders.
In case the same number is to be ordered for each location you can use a destination code that comprises all locations. See above.
Unit price: Enter the unit price. Enter either the price as quoted by the supplier or an estimated price. For the total price this amount will be multiplied by the quantity ánd by the destination code. For a price in other than the base currency enter a space and the currency code after the amount. This currency code must be defined in AFO 242 (‘Exchange rate information’).
Example
70 EUR
When entering the price the following options are also possible:
·
Do not enter a price for the first partial order. No amount will be committed to the selected budget.
When you do not enter a price for any subsequent partial orders, the price will be taken from the first partial order.
·
Enter the code ‘V’ (from the Dutch ‘verplichting’ = commitment). The system then assumes that there already is a commitment for this order made via AFO 243 (‘Budgets’)
The V-option can be relevant for the registration of serial orders for which a fixed amount is entered as commitment at the start of the financial year. The use of this options has consequences for invoice registration. See the description of AFO 243 (‘Budgets’)
·
Enter the code ‘I’ immediately after the price (including VAT). This denotes the price includes VAT. The system assumes that normally a price is excluding VAT.
This code is only relevant if you have chosen bookkeeping model 33, the so-called ‘invoicing model’.
· Enter the code ‘T’ immediately after the price (total price). This denotes that the price applies to the total order. This can only be done with a multi volume order.
· Enter the code ‘K’ (from the Dutch ‘korting’ = discount) immediately after the price. This denotes that a discount of the specified percentage is applicable. This discount does not depend on what is defined (Individual or Global) in the supplier record.
Example:
Unit price: 80IK15 EUR
A price of 80 Euro, inclusive VAT and 15% discount.
Note:
Currency codes must be defined in AFO 242 (‘Exchange rate information’).
Name: The system offers the option to link a name to a (partial) order. E.g. the name of the person who asked the library to order this item. The name must appear in the borrower file. Enter (part of) the name and click on the ‘Search’ button to retrieve a borrower.
After entering all the details click on the ‘’ button. An entry form for the next partial order appears. Clicking the ‘’ button will stop the entry process. After that an overview screen of the order is displayed.
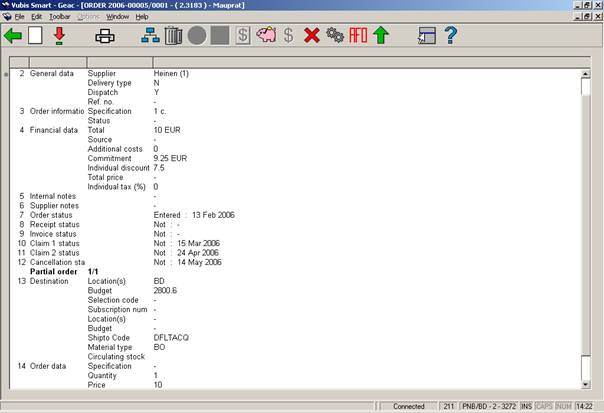
The following statuses are possible:
· 7 Order status: entered, locked (is added to print file), sent. From the moment the order has been sent the claims mechanism kicks into action.
· 8 Receipt status: not, partial (of two partial orders only one was received; not all copies have been received), total
· 9. Invoice status: not, partial (of two partial orders only one was invoiced; not all copies have been invoiced), total
· 10, 11,12. Claim 1, 2, cancellation status: not, partial (of two partial orders only one was received; not all copies have been received), total
If you want to print an order you need to make sure the option Dispatch is set to Yes.
You can print the order directly using the ‘Print’ option; but if you want to generate lists by supplier you must use AFO’s 251, 252, 253.
On the overview screen the following options are available:
: only available on an order that has not yet been printed.
: select a line and then this option to look at more details of that line. Not all fields will be available, depending on which line you choose. See section 211.3.2 for details.
: to (re)print the order.
: when there is more than 1 partial order, this option can be used to switch to the details of another. The system will first display a summary screen.
: only available on an order that has not yet been printed.
: with this option price and invoice number can be entered on an input screen en then be used on the receiving screen (only if receiving has not yet been completed).
: this will switch to the AFO 222 screen. See the help on that AFO for more details.
: only available if an invoice number has been registered for this order.
: this swill switch to a screen with budget details.
: with this option the price can be entered on an input screen en then be used on the receiving screen (only if price information has not yet been entered).
: choose a line and then this option to undo the action. Not available for all actions.
: this will display a brief overview screen of when and by whom the order was created and modified.
: this option will take you back to the search screen.
: this will switch to the display of the order header information.
By selecting one of the line numbers on the overview screen, you can add or modify information in the corresponding fields.
After choosing line 4 an input form for additional financial data is shown:
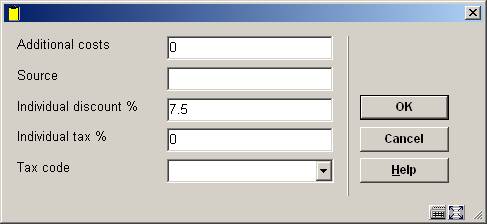
Enter data as appropriate and click .
After selecting line 5 or 6 you will be taken to an overview screen on which previous notes may be listed:

: use this option to add a new message. See below for more information.
: select a line and then this option to modify the details. See below for more information.
: select a line and then this option to delete it. The system will prompt for confirmation.
, , or : select a line and then use these options to change the status of the message.
After selecting the or option, an input form will be displayed:
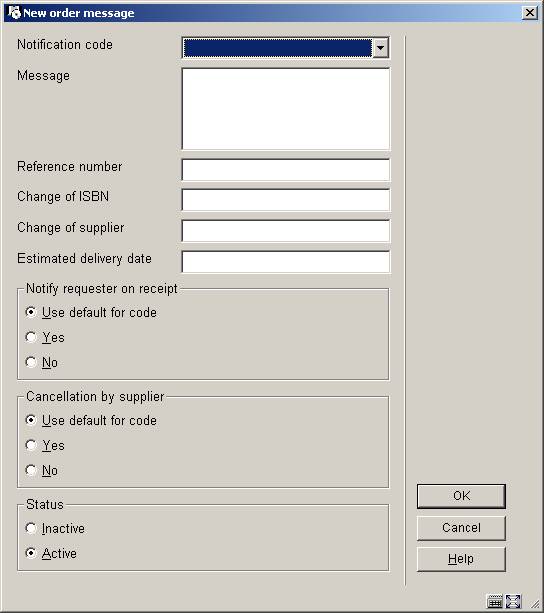
Notification code: choose a notification code from the dropdown list. These codes are defined in AFO 247. Codes can be used to facilitate easy entry, because the system will autimatically retrieve the standard text associated with the code.
Message: alternatively you can enter your own message as free text instead of using a code.
Reference number, Change of ISBN, Change of supplier and Estimated delivery date: optionally enter additional information in any of these fields.
Notify requestor on receipt: check whether or not the requestor must be notified on receipt. If you check ‘Use default for code’ the system will take the setting as defined in AFO 247.
Cancellation by supplier: check whether or not this message means the supplier has cancelled the order. If you check ‘Use default for code’ the system will take the setting as defined in AFO 247.
Status: check whether or not the message is active.
· Document control - Change History
|
Version |
Date |
Change description |
Author |
|
1.0 |
unknown |
creation |
|
|
2.0 |
November 2006 |
updates for release 2.4.2 build 1; added clarification of notes fields; made textual changes (delivered as part of build 1 updates) |
|
|
3.0 |
April 2007 |
Replaced some screen shots |
|